


Today, we'll be discussing and I'll be showing you how to implement light/dark mode using Tailwind, it's quite easy but for a beginner, it might be a little bit confusing at first.
To get started, firstly we do the usual and that is creating a new React app, so let's go ahead:
npx create-react-app my-app
cd my-app
After creating our React application, we need to install Tailwind.
npm install -D tailwindcss@npm:@tailwindcss/postcss7-compat @tailwindcss/postcss7-compat postcss@^7 autoprefixer@^9
The last thing we have to install is CRACO, so let's go ahead and do it!
npm install @craco/craco
To implement CRACO and to make it all work, we need to modify scripts in the package.json file.
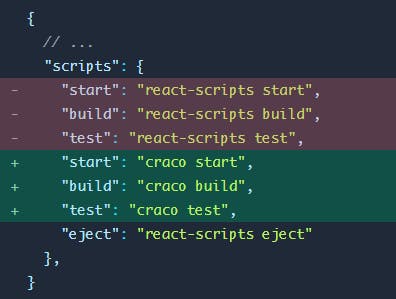
What we do here is we remove the default react-scripts and replace them with CRACO.
Next, we need to create a craco.config.js in our root folder and add the following module exports.
module.exports = {
  style: {
    postcss: {
      plugins: [
        require('tailwindcss'),
        require('autoprefixer'),
      ],
    },
  },
}
Now let's focus on our Tailwind configuration, we run the following command:
npx tailwindcss init
Then we need to change the configuration file itself and this is one of the most important parts to make our color mode work, copy and paste the following configuration:
 module.exports = {
   purge: ['./src/**/*.{js,jsx,ts,tsx}', './public/index.html'],
    darkMode: "class",
    theme: {
      extend: {},
    },
    variants: {
      extend: {},
    },
    plugins: [],
  }
We update the purge parameter so we can work with our components and we set the darkMode parameter to class because Tailwind will check the class.
Now let's head to ./src/index.css - we need to add the following things in the index.css file.
/* ./src/index.css */
@tailwind base;
@tailwind components;
@tailwind utilities;
Now let's get to the fun part! Let's create a function called useColorMode in the src folder.
So what will this function do? - It will add or remove a class on the root div because that's how Tailwind checks the color mode using classes.
/* ./src/useColorMode.js */
import { useEffect, useState } from "react";

export default function useColorMode() {
  const [theme, setTheme] = useState("light");
  const colorTheme = theme === "dark" ? "light" : "dark";

  useEffect(() => {
    const root = window.document.documentElement;

    root.classList.remove(colorTheme);
    root.classList.add(theme);
  }, [theme, colorTheme]);

  return [colorTheme, setTheme];
}
I'm going to set the initial theme to light - you can change that in the setTheme state. After that we head to App.js and we do the following - we create import the useColorMode function and we create a state which checks the color mode.
import useColorMode from "./utils/useColorMode";
function App() {
  const [colorTheme, setTheme] = useColorMode();
}
Now we need a button that will handle the onClick event and will change the color mode itself.
<button onClick={() => setTheme(colorTheme)}> Switch </button>
Now for the last part - for Tailwind to get the styling for the dark mode, we add dark: in the classes themselves. So I'm going to add a wrapper div and add how I want my dark mode to look:
import useColorMode from "./useColorMode";

function App() {
  const [colorTheme, setTheme] = useColorMode();

  return (
    <div className="h-screen app bg-white dark:bg-black text-black dark:text-white transition duration-500">
      <button onClick={() => setTheme(colorTheme)}> Switch </button>
    </div>
  );
}

export default App;
I added a transition as well which gives a beautiful effect when changing color modes.
That's about it guys, you can go a long way when it comes to color modes, show me what you've made in the comments down below!
Thanks for reading.